Before you even turn the key on your VicRoads driving test, there’s a whole stage most learners don’t practice enough — the pre-drive check. This is the very first thing the testing officer assesses, and getting it wrong can rattle your confidence before you’ve even left the car park.
.Here’s exactly what happens and how to nail it — from the team at CoolCat Driving School.
What Is the Pre-Drive Check?
The pre-drive check is a vehicle safety inspection that happens before the on-road portion of your driving test. The testing officer needs to confirm that your vehicle is safe and roadworthy, and that you know where the basic controls are.
It takes about 2–3 minutes. It’s not scored separately, but if your vehicle fails the check, your test won’t go ahead and you’ll lose your appointment fee.
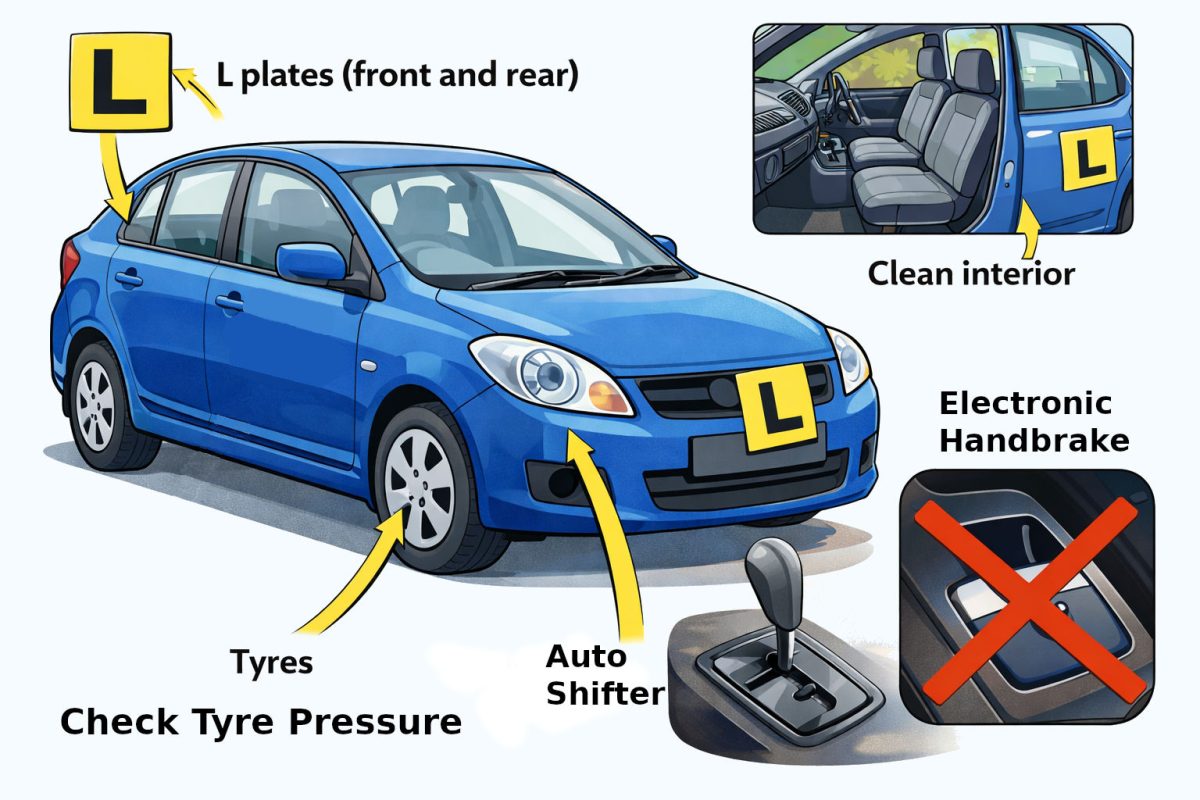
Before You Arrive: Vehicle Requirements
Your vehicle must meet these requirements or you won’t be allowed to test:
- Current Victorian registration — no exceptions
- Roadworthy condition — no warning lights on the dashboard, no cracked windscreen, tyres must have adequate tread
- L plates displayed — front and rear, clearly visible
- No electronic or foot-operated park brake — if you’re doing a solo test (using your own car without an instructor). This doesn’t apply if you’re testing in your instructor’s dual-control vehicle.
- Working seatbelts for all occupied seats
- Clean and uncluttered — the examiner needs to sit comfortably in the passenger seat
- No dashcam or recording devices running — turn everything off before the test
The Testing Officer’s External Check
When the testing officer comes to your vehicle, they’ll do a quick walk-around. They’re looking at:
- Registration plates — matching and clearly visible
- L plates — properly displayed front and rear
- Tyres — adequate tread depth, properly inflated, no obvious damage
- Lights — no broken lenses, all lights present
- General condition — no major body damage that could be unsafe
- Windscreen — no cracks that obstruct the driver’s view
You don’t need to do anything during this part — just wait in the car. But if anything fails, you’re going home without testing.
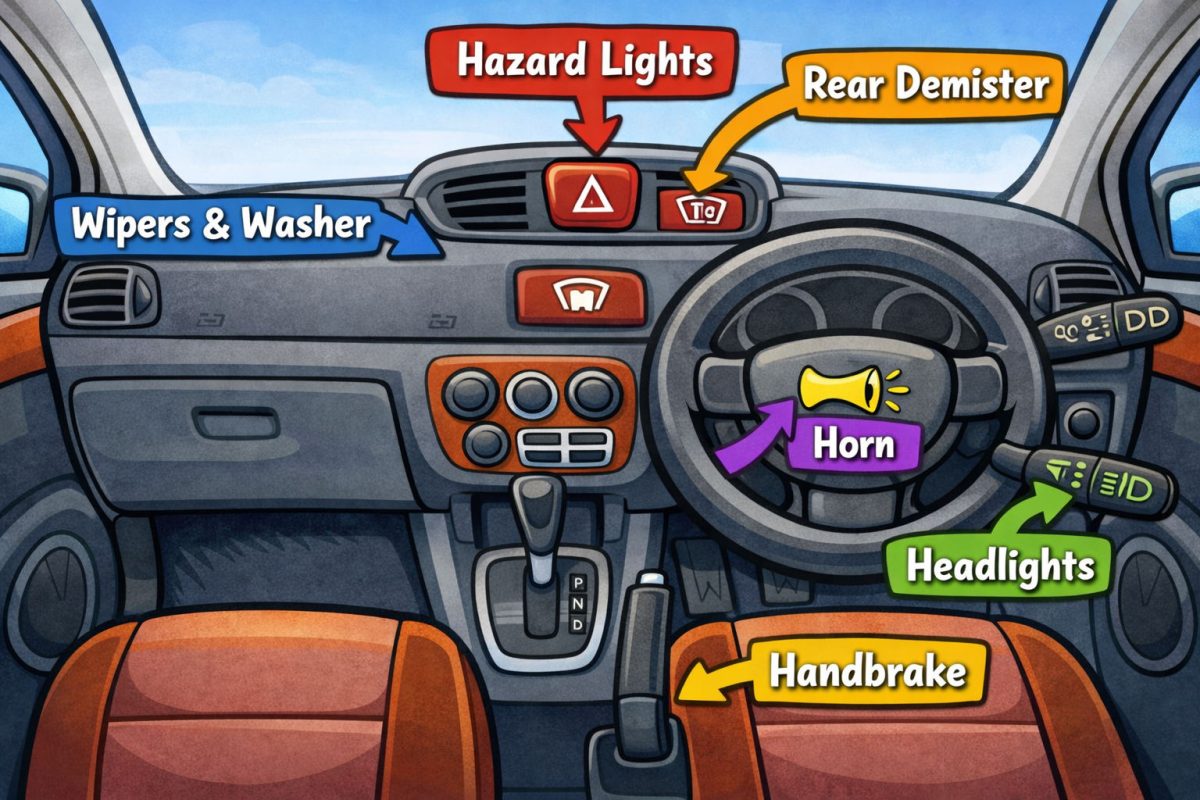
The In-Car Check: What the Officer Will Ask You
Once the officer is satisfied with the vehicle exterior, they’ll sit in the passenger seat and ask you to demonstrate that you know where the controls are. Here’s what they’ll ask you to show:
Indicators
“Show me your left indicator. Now your right.”
Flick the indicator stalk — left, then right. Make sure you know which way is which. It sounds obvious, but nerves do funny things.
Windscreen Wipers
“Turn on your windscreen wipers.”
Flick the wiper stalk. The officer may ask you to show different speeds — most cars have intermittent, slow, and fast. Know where each setting is on the stalk. They’ll also likely ask you to use the windscreen washer — that’s usually a push or pull on the end of the wiper stalk, or a button on the stalk itself. Give it a quick squirt so the wipers and washer fluid both work. If your washer fluid is empty, top it up before test day — it’s a simple check that can trip you up.
Hazard Lights
“Turn on your hazard lights.”
This is the button with the red triangle, usually on the dashboard or centre console. Press it, both indicators will flash. Press again to turn off.
Headlights
“Turn on your headlights.”
Know where your headlight switch is — it might be a stalk twist, a dial on the dashboard, or a separate switch. The officer may ask for low beam and high beam.
Demister / Defogger
“Show me how you’d clear the windscreen if it fogged up.”
Point to or turn on the front demister. It’s usually a button with a windscreen icon with wavy lines through it.
The officer will also ask you to show the rear demister. This is a separate button — usually has a rectangular window icon with wavy lines (as opposed to the curved windscreen shape of the front one). Know the difference between the two — mixing them up is a common mistake.
Horn
“Point to your horn.”
The officer will ask you to identify where the horn is — you don’t need to actually sound it. Just point to the correct spot on the steering wheel. On some cars it’s the centre pad, on others it’s buttons on the sides of the wheel. If you’re testing in an unfamiliar car, find the horn before the examiner gets in.
Handbrake
“Point to your handbrake.”
The officer will ask you to identify the handbrake — you generally just need to point to it, not demonstrate it.
Important note about electronic and foot-operated park brakes: VicRoads does not allow vehicles with electronic push-button park brakes or foot-operated park brakes to be used for solo tests (where you bring your own car without an instructor). However, if you’re testing in a dual-control vehicle with your driving instructor present, this restriction doesn’t apply. If you’re planning to use your own car for the test, check what type of park brake it has — this catches a lot of people out with newer vehicles.
Seatbelt
The officer will check that your seatbelt is on and properly fastened. Make sure it’s not twisted.
After the Pre-Drive Check
Once you’ve shown all the controls, the officer will ask you to:
- Adjust your mirrors — check your rear-view mirror and both side mirrors. Do this even if they’re already perfect. The officer wants to SEE you check them.
- Start the engine — if it’s not already running.
- Wait for instructions — don’t move until told to.
From here, you’ll be directed out of the car park to begin Stage 1 of the on-road test.
Common Pre-Drive Check Mistakes
These are the things we see learners get caught out by:
Bringing the wrong car. Electronic park brakes, unregistered vehicles, bald tyres, dashboard warning lights — any of these means no test. Check your vehicle the day before.
Not knowing where the controls are. If you’ve been practicing in one car but testing in another (like your instructor’s car), make sure you know where everything is in the test vehicle. Sit in the car for 5 minutes before the test and locate every control.
Forgetting the L plates. It happens more often than you’d think. Always carry a spare set.
Having a messy car. The examiner needs to sit in the passenger seat comfortably. Clear out the junk, remove air fresheners hanging from the mirror, and make sure the glovebox isn’t overflowing.
Leaving your phone on. Your phone, any dashcam, and any recording device must be completely off — not just on silent.
Pro Tips from CoolCat Driving School
Here’s what we tell our students before every test at the Mitcham VicRoads centre:
- Arrive 15 minutes early. Rushing increases nerves.
- Practice the pre-drive check at home. Run through all the controls the night before until it’s automatic.
- If you’re using your instructor’s car for the test, have a lesson immediately before the test to warm up and get familiar with the vehicle.
- Take a deep breath before the officer gets in. The pre-drive check is the easy part — it’s just showing you know your car. You’ve done this hundreds of times.
The pre-drive check is straightforward if you’re prepared. It’s the on-road test that needs the real practice — and that’s what we’re here for.
Ready to get test-ready? Book a lesson with CoolCat Driving School — we’ll make sure you know every check, every control, and every route before your big day.